Sunshine Printing
- gbdrcf05
- May 2, 2021
- 6 min read
Aloha friends and welcome (back) to my website! :)
Today, I have for you some images showcasing my experiences with sun prints.
Firstly, what is a sun print?
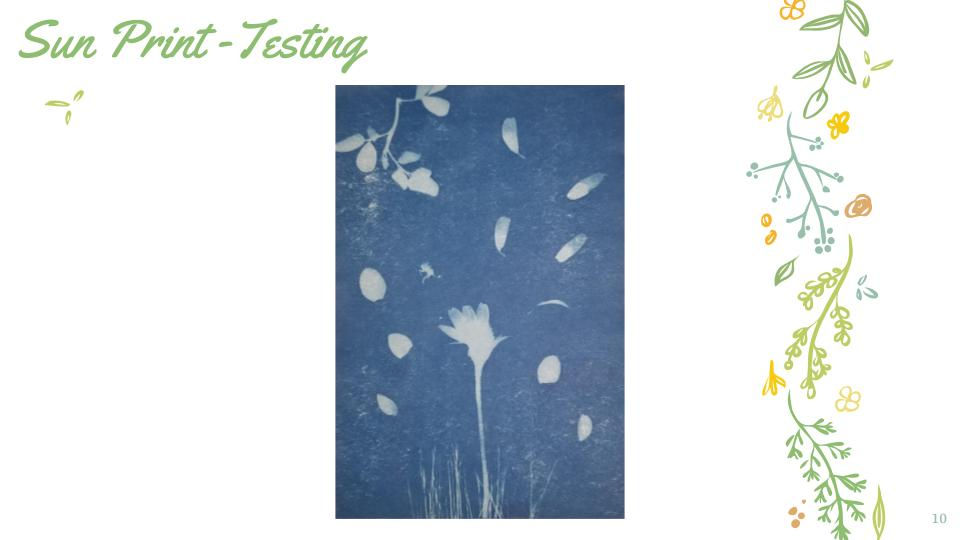
A sun print is basically a lower-quality version of a photogram. The sun print paper is activated when exposed to direct sunlight. The paper will turn a light blue to white color in the areas that were exposed, and the areas that were not exposed to remain in the dark blue color. However, once rinsed underwater, this sort of negative film version of the sun print will be inverted and what was once white will then become the dark Deep Blue, and what was once the deep blue will become the light blue to white color.
Working with the sun prints and this special paper helps prepare people for working with photograms, which then prepares people for working with film negatives. The camera-less process allows for more tangible photos which have somehow been kind of drowned out with all of today's technology. We're all about technological things and technology advancements we're all taking digital pictures, However, these more physical and tangible inversion processes of sun prints and photograms and in film negatives are all still important and very fun to work with.

When practicing with the test print paper before creating my actual final test print, I learned about what objects would be best to use for a sun print and what objects would not be best to use. Some of the things that are good to use include flatter objects whereas some of the things that are not good to use are more 3D or rounded objects. This is because the 3D objects can cash shadows and in the shadows will create weird shapes on the sun print paper. when working with flat objects, there will basically be little to no shadow which causes better results.
I thought that working with the sun print paper would be simple, but there are various steps you have to take in order to ensure that your end result is the way you want it to be. For example, you have to make sure that the weather is permitting. This means that you need to be working on a day that has direct sunlight and it isn't raining and it isn't windy. If it's windy, and you don't have something covering your objects, then they might move or blow away and that'll affect the outcome of the print. and, if there's not direct sunlight, then it won't be as exposed or the result won't be as vibrant or the results won't be as detailed and there might be weird shadows cast preventing the Sun from hitting the paper.
From working with sun prints, I have formed a deeper knowledge about the inversion process used when developing the negative roles of film. Which, I feel, is important to understand. I also have learned how easy it is to mess up your final product if not everything is correctly set up. and I learned about how quickly exposure happens, even though with sun prints, it isn't as fast as photograms and film negatives. But, overall, I've had various takeaways from working with sun prints.

There were three different themes we could have chosen from when creating our sun print: Plastique Magnifique, Earth Bio, and Thyself. For my sun print design, I chose to do the Earth bio theme, which is basically just using natural objects to create my sun print. In order to have the best results, the objects that I chose were on the flatter side and to the 2D side. This also means that they were on the thinner side. Like I had mentioned before, this was to reduce the amount of shadows cast by the objects in order to create a cleaner look to the sun print.

After playing around with potential compositional arrangements and deciding on one of them, the design factors that I considered while positioning my pieces and objects onto the paper were the paper orientation, the use of available space, the size of the objects, the manipulation of the objects, the use of ground, and even the transparency or opaqueness of objects. I thought about all of these things when choosing my final compositional arrangement because I wanted everything to work together and complement each other and I wanted it to turn out correctly. Like I said with sun prints, things can be easily messed up, so it's best to consider everything before exposing the paper.

For my sun print, I didn't really plan out other compositional arrangements specifically, but I had noted that there were different ways that I could have placed the objects and I quickly visualized them. However, I tend to be impulsive with art, I don't tend to like making plans or different options for the same thing, so I didn't physically make other compositional arrangements. so, there wasn't really one thing that I preferred with my final arrangement over the ones I had previously thought about. It was just a spur-of-the-moment type of thing. I kind of just took my materials and organized them on the paper based on how I thought a cool layout would look, and it kind of just happened from there. I didn't really have an idea of what I wanted to do, all I knew is I had these leaves and flowers and all these things from the earth bio theme, but eventually, I just put something together.

This last-minute decision ended up being a composition that resembled some animals on the savanna. So in order to create this, I actually took the leaves that I had found and cut them into animal shapes. And then to make the trees I took branches from actual trees and used shears to cut off excessive branches and basically shaped the branch to look the way I wanted it to. And then I used a flower for the Sun. I thought it was going to look cute and to be honest, I'm not too happy with the final print, but I also don't think it could have turned out better, so I'm okay with it.
After doing the sun print, I feel like the camera list photographic process is something different than what we're used to nowadays with digital photography. I'm very fortunate that I got to test out sun prints, even if they're not the coolest things in the world, I'm still very fortunate to have tested a more tangible photography style. I think it's really interesting how light is needed to record an image. I now have a deeper understanding of the inversion process with film cameras, also. I feel like once you test with a sun print, if you hadn't worked with film or photograms before and of course if you haven't worked with sun prints before, then it is a good way to deepen your understanding of how photography works, and how the inversion process works.
Because I was only partially satisfied with my results and if I had the option to redo my sun print, I don't think I would. I feel like I did what was in my control to prepare for my sun print, yet it still didn't turn out the way I wanted it to. And I think that's because sun prints aren't as high-tech as I'm used to. I'm is basically just like black and white, except it's blue and white. They're very simple. So, I wouldn't change the theme. I wouldn't change my objects. I wouldn't change the composition arrangement. I wouldn't change the exposure time. I wouldn't really change anything.
I didn't really face any environmental challenges while working on this sun print either. The only challenge I really faced was acknowledging that sun prints are simpler than what I thought there.
With this all being said, I do feel more confident with how objects are recorded with the cameraless medium as I see what is ahead with photograms. I am looking forward to working with photograms as I have heard that they are more high-tech and more detailed than the sun prints. Maybe and hopefully I'll be able to get some more elaborate designs with them.
Thank you for taking the time to read this post! If you like what you read/saw, please be sure to check out some of my other posts!
I am honored to be taking you along on my photography journey! I hope you stay safe and have a wonderful day. Much aloha!
For exclusive posts, behind the scenes, editing, photos fails, and more, follow my Instagram @giabellephoto or by clicking the Instagram icon at the bottom of this website! Mahalo!


Comments