The Basics Behind the Snaps
- gbdrcf05
- Dec 12, 2020
- 5 min read
Aloha friends and welcome (back) to my website! :)
Today, I have for you some images showcasing certain aspects of the photography basic settings. Let us take a look at different techy-camera things can help create the images photographers take.
In the following images, you will see that there are a variety of different photos I have taken within the past several months, all of which explore a certain setting on my Canon Rebel t3i DSLR Camera. Because I was using a DSLR Camera which already has these settings available for me to change and utilize, no apps were necessary to get the desired affects on my images.
Before taking the time to create the images showcased in this post, I had had previous experience with a lot of these camera settings and have utilized them in my previous photography.
Of course I knew how to use the flash on a camera, however, I never really like to use it. I don't tend to like the results of images that use a flash. Although, in order to showcase flash fill photography within this post, I had to use it (😒, you're welcome). I've also used different ISO settings within my photography, prior to capturing these select images, however, I was never really too sure what it did. And, although I was aware of exposure compensation, I did not typically pay too much attention to it and just used settings that I felt looked correctly exposed.
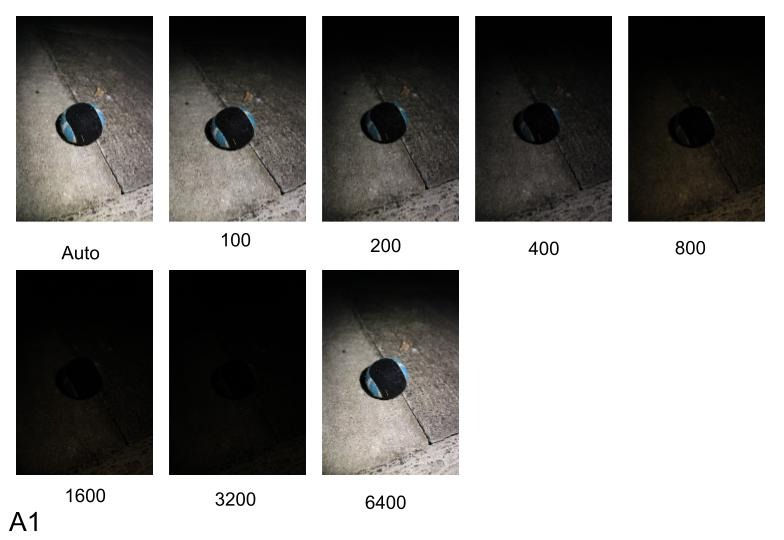
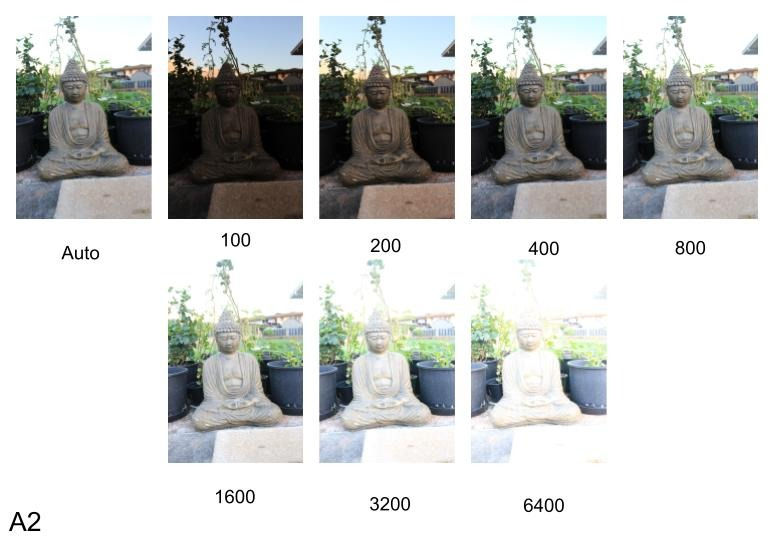
The first setting on my camera that I decided to mess with in order to demonstrate the basic controls of my camera was ISO. In the two photos collages titled (bottom left corner) 'A1' and 'A2', I had used every ISO control setting on my camera. A1 demonstrates these changes in ISO in a low-light situation, whereas A2 demonstrates these changes in ISO in a bright-light situation. It may be important to note that I was changing these settings while on my camera's manual mode, not a preset mode.
When taking these photos, it was discovered that ISO increases the camera's light sensitivity. Such as that, the photo is more lit up! (This also increases the amount of noise within a photo). However, the noise within the images could be lessened or removed via editing afterwards.
Based off of the variety of images, high ISO should be used with darker lit situations such as night street photography. Whereas lower ends of the ISO scale should be used in brighter situations such as outdoor photography midday.

The second setting I messed around with on my camera was the exposure compensation. My camera does allow for me to increase and decrease my exposure and has an exposure compensation scale of -5 to +5, but this scale varies from camera to camera, which is why I only captured images using -3 to +3.
Taking a look at ISO vs Exposure Compensation, I personally prefer to change my exposure compensation settings over my ISO settings for most of my photography. However, if I need to take a photo with a quick shutter speed in the dark, I will change my ISO settings rather than my exposure compensation in order to keep the shutter speed quick enough.
Along with the first two settings I decided to play around with and change, I also decided to try to work with my camera's built in flash. The two main techniques I used are called 'Flash Fill' and 'Forced Flash'.
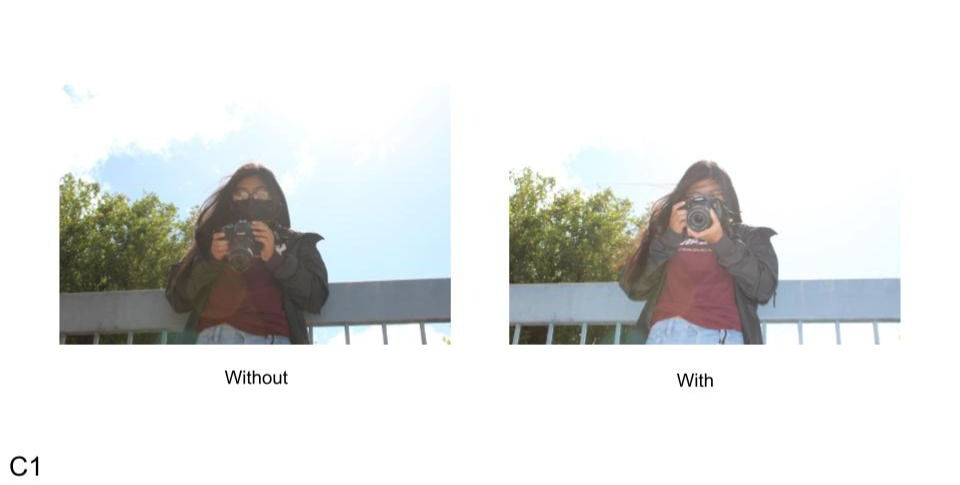
In the first side-by-side comparison photos of the girl holding a camera, I used the Flash Fill technique. This technique does just as it's title suggests, and fills in awkward shadows! It illuminates any areas of an image that are dark or are not receiving any light.
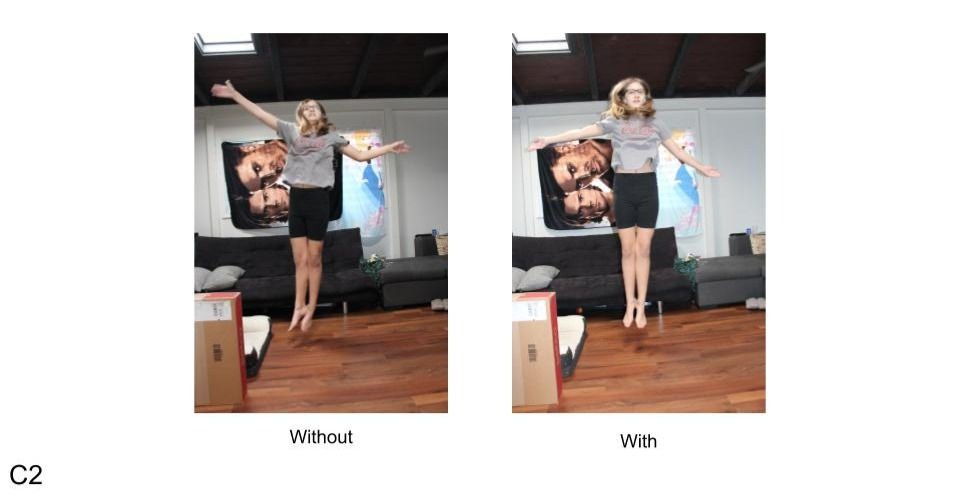
In the second side-by-side comparison photos of a different girl jumping, I used the technique of Forced Flash. What Forced Flash can do is freeze motion; pretty kewl, huh?
In the image on the left, you can see that the girl jumping is blurry and you can obviously tell she was moving because of that blur. That image is without using the Forced Flash technique. Now, the image on the right, the girl jumping is more clear, in focus, and had almost no blur. Because of this, it almost looks as if she was not moving at all. This photo was with using the Forced Flash technique.
From experimenting with this camera setting, I can tell that good times to use Flash Fill/Forced Flash are in situations that deal with poor lighting and weird/awkward shadows, as well as images in which I wish to freeze motion and really capture what is going on in the photo, clearly.
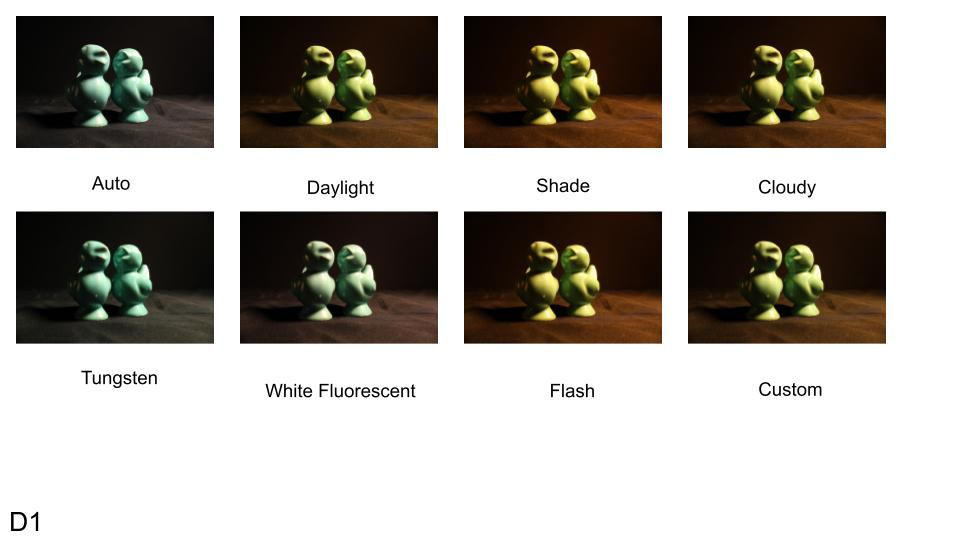


The final technique I decided to experiment with while doing this photo shoot is my camera's white balance settings and how they affect my images in different situations. From prior knowledge, I know that white balance sort-of acts as a built in filter for photos. There is a variety of different 'filters' that my camera has, so I decided to test out all of them!
Before this specific shoot, I had not really worked with white balance, before. I usually always left my camera on automatic white balance mode and let my camera do it's thing. However, because I was trying to differentiate between certain white balance settings, I did take it off of automatic mode!
In the first image collage titled, D1 - White Balance, I had used every single one of the white balance setting modes on my camera in order to display what each does. In the second photo collage, side-by-side comparison titled, D2 - White Balance Correction, I tested out only two different white balance 'filters'. The image on the left is displaying an 'incorrect' white balance for that particular subject, and the image on the right is displaying a more 'correct' white balance for the photo. And finally, in the third photo side-by-side comparison titled, D3 - White Balance Enhancement, I used whichever white balance setting I felt best fit the image and/or enhanced the result.
Using these white balance settings can be useful whenever there is certain temperatures present within the current lighting. For example, if a room has a warmer toned light, but you don't want your image have that warm tone, you can use a cooler toned white balance setting, such as Tungsten. Or, the opposite could be true and you really want to enhance the warmness in a situation, such as perhaps a sunset. Then, you would use a warmer toned white balance such as Daylight or Shade.
I would say the top two settings I really like using after this shoot are white balance and exposure compensation.
Before doing this experimentation, I never really touched the white balance settings on my camera. But, now that I know how to use it and what it can do, I feel that it will help me better capture the photos I want to. I feel that using my knowledge of white balance can help me express certain tones and feelings through my future photography.
Also, I feel that exposure compensation is extremely important within photography. After taking the time to work with exposure compensation, specifically, I now pay more attention to it than before, and I will be more aware of it in my future photos. I will definitely help me achieve the proper exposure (or near it) in each of my images. It may sound simple, but I believe the exposure of an image is truly powerful in how much it contributes to the overall appeal of the image.
Thank you for taking the time to read this post! If you like what you read/saw, please be sure to check out some of my other posts!
I am honored to be taking you along on my photography journey! I hope you stay safe and have a wonderful day. Much aloha!
For exclusive posts, behind the scenes, editing, photos fails, and more, follow my Instagram @giabellephoto or by clicking the Instagram icon at the bottom of this website! Mahalo!


Comments